Avocado Chocolate Cookies Recipe

IMG_1520

I have a sweet tooth. I have had it ever since I can remember. Growing up I always craved cookies, cake, chocolate, you name it. Every year for my birthday I would get an ice cream cake from the famous Baskin Robbins. My favorite part was when the frosting was cold and hard right out of the freezer. I would enjoy the cake on my actual birthday and would always have a piece for breakfast the next morning. In college I can remember having a whole summer where my lunch consisted of a pint of Ben and Jerry’s oatmeal cookie dough ice cream. Eating dessert like this never crossed my mind as a bad thing. It was just wanted I wanted and therefore I did it. Now with 20/20 hindsight I can see how much sugar I consumed and just how bad it was for me.

Now I almost never indulge in dessert. Not because I don’t love it, I do. I have just learned I still have no self control when I eat it. I will tell myself I will only have one bite, then I will have a second, third, I am soon licking the plate and laying in bed with a sick stomach. I will now save my dessert indulgences for special occasions like weddings, birthday’s, or when I place is famous a treat on the menu. However let’s be realistic, sometimes you need something sweet. This is where I have learned to make desserts that hit the craving, but also will not kill your waistline.

This recipe like many others I use I found on pintrest. My favorite recipes are the ones which are easy, fast, and have only a handful of ingredients. Did I also mention they need to taste delicious as well? This is a great go to if you are craving something sweet. The best part about it is you can also eat these cookies for breakfast as well. No need to wait till the end of the day. I enjoyed my cookie right out of the oven with a glass of cashew milk. A perfect end to a long day. Hope you enjoy!

Ingredients

  • 1 and 1/2 avocado
  • ½ cup coconut sugar (I got mine at Trader Joes)
  • 1 egg
  • ½ cup dark cocoa powder
  • 50 g. dark chocolate chips (I didnt have any around, so I used walnuts instead)
  • ½ tsp. baking soda

Instructions

  1. Preheat oven to 350° F.
  2. In a bowl mix together avocado and coconut sugar until smooth. Add in the egg. ( I used my kitchen aid)
  3. Mix in the cocoa powder and baking soda.
  4. Add in chocolate chips or nuts
  5. Using a spoon place dollops of cookie dough in a baking sheet with parchment paper. This should yield about a dozen cookies.
  6. Bake for 8-10 minutes or until the cookies don’t stick as much to the paper as they did before baking.
  7. Cool down end enjoy! These cookies also taste really good cold, so you can put in the fridge as well

Spaghetti Squash Chow Mein Recipe


IMG_0837

Life has just been busy lately! After a new and exciting promotion at work my days are now all consuming with very little time to rest. Then my evenings have been packed with fun events like birthday celebrations, concerts, yoga dates, etc. What does all of this mean? Well my nights have not been filled with cooking robust meals. It has been easy, quick, and healthy dinners like eggs with veggies, stir fry’s, or an open faced sandwich. However last week in spite of all of the madness that has been my life as of late, I was able to take a moment to myself and cook a recipe I have been wanting to try for a while.

I found this recipe looking through Pintrest. The moment I saw the picture I knew this dish was going to have to be made. What also sealed the deal on it was I already had most of the ingredients at home, so it also made it an easy week night dish. Overall the dish was pretty easy to prepare, although the longest part was backing the spaghetti squash, which takes about 40 minutes. I made a few changes to the recipe based on what I had around, however I have indicated what changes I made below.

Preparation was quick and when it was all done, I filled up a bowl for me and one for Dustin. By the end of the meal my bowl was pretty much licked clean. This dish did not disappoint! It really did taste like chow mein, however without that heavy gut feeling after eating an entire bowl of the real stuff. This recipe is healthy and delicious. I have to say t is a must try , especially if you are craving some Chinese food. Next time I might add some shrimp or chicken into it to get a little extra protein. Hope you enjoy!

Ingredients

  • 1 large spaghetti squash
  • 1/4 cup soy sauce (I used Braggs Liquid Amino Acid instead. This is a staple in our household for cooking)
  • 3 cloves garlic, minced
  • 1 tablespoon brown sugar, packed (I used honey since I was out of brown sugar)
  • 2 teaspoons freshly grated ginger (I used powdered ginger as that is what I had at home)
  • 1/4 teaspoon white pepper
  • 2 tablespoons olive oil (I cut this down to 1 tablespoon)
  • 1 onion, diced
  • 3 stalks celery, sliced diagonally
  • 2 cups cole slaw mix (shredded cabbage and carrots)

Directions

Cut a spaghetti squash in half length wise and scoop out seeds. Lay skin side up in a 13 x 9 dish and pour about 1/2 inch of water into the pan. Bake at 400 degrees for 30-40 minutes, until the flesh becomes tender. When done scoop out the flesh with a fork so it breaks apart into strings and set aside.

In a small bowl, whisk together the soy sauce, garlic, brown sugar, ginger and white pepper; then set aside.

Heat olive oil in a large skillet over medium high heat. Add the onion and celery cooking until tender, which is about 3-4 minutes. Add in the cabbage mix at the very end for about 1 minute.

Next stir in spaghetti squash into the large skillet and pour the  sauce mixture over top. Stir everything for a minute or so to make sure it is all combined. Then you are ready to eat!

Oat Bran Breakfast Porridge Recipe

IMG_0670

Breakfast is my favorite meal of the day. I love all types of breakfast food, oatmeal, greek yogurt, eggs and toast, you name it. I have also found when there is a breakfast I like I will become obsessed and will eat it everyday without fail. I had years of oatmeal with cinnamon and a cut up apple, to me it tasted like a warm apple pie. Then I moved onto overnight oats, a mix of greek yogurt and oats, mixed with grapes. It is creamy, sweet, and easy to enjoy leisurely. This has now been my staple for the last couple of years. Although now it has come to be that time where I might have to switch it up. And to what one might ask? Well I think I may have just found my new breakfast love, an oat bran porridge.

I found this recipe like I do so many, looking through my beloved Pintrest. I had some extra oat bran around the house from a quick bread I had made. Staring at the bag I pondered to myself, could this be more? As I typed in oat bran into the key words search engine I became pleasantly surprised to learn yes it could be. Not only could it be more then just an ingredient someone bakes with, but it could be a whole meal on its own. I took the recipe and immediately made the porridge. However I knew it was going to need just a little something else.

A few months ago Dustin started to dress up his oatmeal. He started to add eggs, blueberries, chia seeds, and and almond butter making it a huge power breakfast. At first glance it seemed quite gross to me.  I mean it looked like such an odd combination. Although upon trying his concoction I became quite obsessed. When making the porridge for the first time I decided I would make it Dustin’s way, adding eggs and blueberries. I have to say it ended up being really delicious and filling! That is one thing I love about simple oats or porridge’s like this, there are plenty of easy mix ins one can add. Almond Butter, Banana, apples, brown sugar  to make it sweet, but one can also add in eggs, kale, squash, nuts, to make it savory.  The options are endless! Below is the quick and easy recipe, it takes only about 5 minutes to prepare.


Makes 1 serving (although I made a larger batch so I could have it for a few days)
Ingredients

1/2 cup oat bran
1/2 cup water
1/2 cup milk of choice (I did almond milk)
1/4 teaspoon cinnamon
Sweetener of choice (stevia, brown sugar, etc. to taste)

Place oat bran, water, milk and cinnamon into a small saucepan over medium heat. Cook stirring frequently for about 3 to 5 minutes or until the mixture starts to bubble. You want the mixture to thicken and it is better to under-cook rather than over-cook it.  Once you remove it from the hear allow a couple of minutes for it to thicken a little more and then add in your sweetener and fixings. Mine was 1 egg and 1/4 cup egg whites scrambled together with a 1/4 cup of blueberries.

Creamy Pumpkin Chili Recipe

Image-1

Over the holidays I went back home to Colorado to see my family and friends. One of the perks of being away from work and your real life is having the time to enjoy leisurely activities, like reading books and magazines.  I had brought a whole stack of my favorite and very much neglected magazines with me to enjoy flipping through while drinking my morning coffee.  In one of my beloved subscriptions I came across a recipe for a pumpkin bean chili. I looked out the window to see the snow falling down with bursts of wind in the 20 degree weather and I knew this meal was exactly what I needed to hit the spot for the day. Plus I am also just an addict for anything that has pumpkin in it.

Let’s also take a moment to talk about how much I love soups and chili’s because they are so quick and easy to fix, along with being healthy and filling. Not to mention you really can’t mess them up. For anyone who is new to cooking, I highly recommend just making a batch. Trust me, you really can’t go wrong. I decided I wanted to change the recipe a little bit to make it creamier and a little heartier, which involved adding lite coconut milk and some ground beef. I just made this dish again on Sunday and was able to tweak it a little bit more. I now feel like this recipe is a keeper. I will preface the photo’s above do not do this dish justice.

Ingredients 

1 Can of Pumpkin

2 Can’s of Diced Tomatoes

1 Can of Lite Coconut Milk

1 Whole Diced Onion

1 Can of Hominy

1 Can of Kidney Beans

1 lbs of Ground Beef

1 Tbs Cinnamon

1 Tsp of Salt

1 Tsp of Garlic Salt

1 Tsp of Brown Sugar

Serves 6-8

Steps

First take a large Dutch Oven, I used my 6-Quart, and saute the diced onion with a little olive oil for about 5 minutes till the onion is translucent. Next add in the Ground Beef and saute until it is almost fully cooked through.

Next add in all of the remaining ingredients.  Next cover on medium heat for about 5-10 minutes. You can also add a little avocado or greek yogurt on top if you want to make it a little creamier. However with the coconut milk it tastes pretty good without all of the fixings. Once hot spoon out and enjoy!

Red Lentil and Sweet Potato Stew Recipe

1

Let me put it out there, I read a lot of magazines. Something about opening up your mailbox, seeing the cover photo of your favorite guilty pleasure, new and staring back at you,  just  makes you feel like a special present has just been sent soley to brighten up your day. I always felt like I officially was an adult with my own place when I started to subscribe to every magazine I had ever wanted.  One of these magazines was one of my all time favorites from  Martha Stewart’s publications called Whole Living.

This magazine always seemed to capture what I loved about so many of my separate reads into one beautiful master monthly publication for my liking. It had the comforting home segment like Real Simple and Martha Stewart Living, but mixed in with the healthy living and fitness aspect like Fitness and Women’s Health. I found out of my 8 subscriptions this was the one magazine I held onto way too often as there was always just too much goodness in it to throw out.  Alas what happened to my beloved, well it was discontinued in 2013 and I found my magazine subscription life had to move on without it.

I still have a few of the best issues tucked away in my wicker magazine basket and the other day when the weather starting to turn a little cold I knew exactly what recipe I wanted to make and where to grab it.  The recipe was part of a 3 week detox plan in the 2013 January edition. I attempted to try the whole detox and made it through the first week before jet setting off to New York for a week of work and fun with friends. Obviously once the plane hit the ground the detox was off, but I found I came back for weeks after trying all of the various recipes upon returning home.

One of my favorite was the Red Lentil and Sweet Potato Stew. This dish is filling, healthy, flavorful, and hits the spot on a chilly night. It says it makes 4 servings, but really I found it to make about 6. The other night we paired it with a little brown rice, which added a little more girth to it. It is really easy to make, quick to cook, and only gets better after a day or two. My only complaint, it is not very photogenic. So I apologize for not having a great glamour shot of this one. However I included the link to the recipe at Whole Living so you can see a more mouthwatering rendition.  I hope you enjoy!

FullSizeRender

Red Lentil and Sweet Potato Stew

Whole Living, January/February January/February 2013

Ingredients

  • 2 Tbsp coconut or extra-virgin olive oil (I just used cooking spray to save a few calories and it worked well)
  • 1 tsp ground cumin
  • 1 tsp ground turmeric
  • 1 Tbsp curry powder
  • 1 diced large onion
  • Coarse salt and freshly ground black pepper
  • 4 minced cloves garlic
  • 2 Tbsp minced fresh ginger
  • 2 peeled and diced sweet potatoes
  • 1 diced (stemmed, seeded) red bell pepper
  • 1 1/2 cups rinsed red lentils
  • 6 cups vegetable broth

Directions

  1. Heat oil in a large pot over medium heat. Cook cumin, turmeric and curry powder until fragrant, about 1 to 2 minutes. Add onion with a few pinches salt, and cook, stirring, until tender, about 6 minutes. Add garlic and ginger and cook, stirring, until tender, about 2 minutes. Add sweet potatoes and bell pepper and cook 1 minute.
  2. Add lentils and Broth. Bring to a boil, then reduce heat and simmer until lentils are tender, 20 to 25 minutes. Season with salt and pepper.

Rotation Diet- Day 1

photo 3

I don’t know about you, but every now and again I find myself in a situation where I have indulged more than I would have wanted to. It is one party or event after another and no matter how good I usually am I find yourself continuing to have a couple of drinks, a piece of dessert, or that late night slice of pizza. Since I eat healthy most of the time I can really feel it when I have eaten poorly too often and frequently. I start to feel lethargic, bloated, and it even affects how I sleep. After this last weekend celebrating the marriage of my best friend and binge eating more then I have in months, I decided I needed a re-boot.

photo 2

One of the benefits of having your boyfriend as a personal trainer, is your home is filled with interesting books on fitness and health. On a bored night a couple of weeks ago I picked up  the book “How to Eat, Move, and Be Healthy” by Paul Chek. Dustin raves about this book, so I thought why not take a look. In the very back of the book Paul describes a rotation diet, which was the first I had ever heard of this type of diet. Since I read so many books on nutrition I was surprised there was something completely new to me.

photo 1

The premise of a rotation diet is  you alternate the foods you eat daily for 4 days in order to help identify food intolerance’s, detoxify your body, help your digestive system get back on track, and can even help to lose weight. “To follow the rotation diet, eat only the foods listed on that particular day. You may have those foods as many times as you like on that particular day, but then you should not consume any of those foods.” Foods are grouped together based on  their food families and because they share similar protein structures and are therefore digested similarly by our bodies.

photo 4

The link here provides a good explanation of the Rotation Diet along with how each day breaks out in terms of food. I decided I can at least try this out for 1 full rotation, aka 4 days, and see how it goes. Today was day 1 for me. I have to say the hardest part so far has been the meal prep. Yesterday I had to go to the farmers market and then the grocery store to stock up on enough various fruits, veggies, and meats. Last night also required cooking meals in advance for today. Overall though I have to say so far so good. I have felt full and satisfied after each meal without that urge to snack out of control, which is something I always struggle with. I almost never eat red meat so eating it tonight tasted amazing and just what my body needed. I am excited to see how I sleep tonight and how I feel tomorrow morning. So I am sure you are wondering what  my meals consisted of today, well below breaks it all down. However I do want to note I am a grazer so there may have been some grapes or cherry tomatoes popped throughout the day outside of what I listed below.

Breakfast

  • 1 small banana
  • 1/2 cup of grapes
  • 1/2 cup of mango
  • Coffee with cream

Lunch

  • Half of an Eggplant baked with tomato sauce and mozzarella
  • 2 small red potatoes and eggplant baked with dill
  • 1 pan fried plantain

Snack

  • 1/2 cup of grapes
  • 1/2 cup of mango
  • 1 oz of cheese

Dinner

  • 5 oz Ground beef, bell pepper, lettuce tacos
  • 1 sliced tomato with sprinkled sea salt

Curry Shrimp Recipe

photo 5

Let me say, I love curry! Indian and Thai food are always some of my favorite take out dishes on a cold winter night. Something about the warm dish mixed with full bodied spices creates a very comforting feeling. Now although I have to say I crave curry more in the winter, it can also be a great summer dinner as well.

photo 1


Yesterday my mom and I went to see The Hundred Foot Journey with Helen Mirren. What does this have to do with curry? Well the movie is all about food, with an emphasis on Indian cuisine. The food dishes were visually impact-full and stunning. It made you leave with your mouth watering and a strong desire for some good Indian Food.

photo 2


This lead me to want to make my easy curry shrimp recipe and share it with all of you. This dish is a lot lighter then most curry fare you find out, but hits the spot all the same. It is easy, filling, and delicious. You can add in other vegetables then what I have mentioned below, this just happened to be what I had on hand.  Hope you enjoy!

photo 4

Curry Shrimp Recipe

1 lbs of Green Beans Trimmed

1 pound cooked shrimp

1 Can Water Chestnut’s

1/2 Onion Chopped

1 cup light coconut milk from a can

1 Tablespoon Olive Oil

1 Tablespoon Curry Powder

1 Tablespoon Cumin

1 Tablespoon Soy Sauce

1 Tablespoon Brown Sugar

1 Tablespoon Corn Starch

Instructions

1. Bring a large pot of water to a boil and add 1 tablespoon salt. Add the green beans and cook until just tender, 4 to 5 minutes. Drain and run under cold water to cool; transfer to a serving bowl.

2.  In a large skillet add olive oil and onion. Cook until slightly brown. Add in coconut milk and all of the spices. Next add the shrimp and green beans. Cook for about 5 minutes on medium heat

3. Ready to serve! I added mine on top of brown rice


Easy Turkey Potato Salad Recipe

photo 13

Over the 4th of July weekend Dustin and I went up to Shasta Trinity National Forrest  to go camping with some of our closest friends for the weekend. Over the trip a debate started with the group on whether or not our generation still eat’s potato salad. I mean yes, if potato salad is at a picnic we will eat it. However if there was going to be a pot luck or party would this be a dish we would think to bring? In a generation where we are being over saturated with new grains like quiona, farro, barley and trendy leafy greens like Kale, have we forgotten about a classic dish like potato salad? After discussing this topic the only solution I could come up with was I was craving potato salad and decided I needed to make a healthy version at home. This recipe was not from a cookbook or found online, I simply made it up. So feel free to tweak and add to suit your liking.

 photo 12 photo 11 photo 10 photo 9 photo 8 photo 7 photo 6 photo 14

Ingredients

  • 2-3 Large Carrots diced
  • 2-3 Large Celery Sticks diced
  • 1/2 Chopped Onion diced
  • 1 Large Bell Pepper diced
  • 1 1/2 Cups of grapes
  • 2 Medium potatoes cooked (also can use 5-6 small russet potatoes)
  • 1 Cup diced turkey (I used the Trader Joes pre-cut version)
  • 1 Cup Non-Fat Greek Yogurt (Fage is my favorite)
  • 2 Tablespoons of honey mustard
  • Splash of salt, pepper, and garlic salt
  • Option to add a tablespoon of curry

Makes about 6 servings. Mix everything together and enjoy!

Vegetable Cornmeal Crust Quiche Recipe

Lately eggs have become a big staple in our home. Every morning when I come back from the gym I walk into a warm apartment filled with the fragrant smell of eggs sizzling and crackling as my boyfriend makes his daily breakfast. This new ritual has now become a very comforting way to start my day and something I look forward to. Since I do not have time during the work week to make eggs for myself for breakfast I decided to make a cornmeal quiche instead so I could also get my egg on during the week. Quiches are great because you can eat them for breakfast, lunch, or dinner.

photo 1

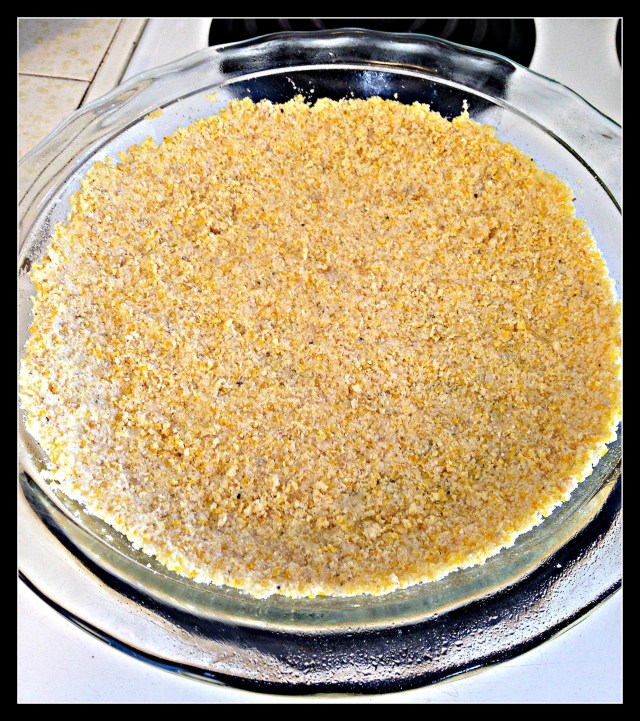
I had some extra cornmeal round the house so I decided I would make a cornmeal crust for my quiche and then I used the vegetables I had in the fridge so I did not have to go to the grocery store. I love it when you can cook from what you have! First I made the crust. I used my 9″ glass Pyrex pie dish and sprayed the inside with some cooking spray to get started. For the crust I used the below ingredients:

Cornmeal Crust Ingredients

  • 1 Cup Yellow Cornmeal
  • 2 Tbs Butter ( I used Harvest Award Canola Oil butter as 1 Tablespoon is about 80 calories vs 100 in regular butter. This also makes it vegan)
  • 1 Tsp Agave Nectar or Honey
  • 4 Tbs Ice Water

photo 2

For preparing the crust I first melted the butter and then combined it with the cornmeal in a mixing bowl. After they were fully mixed together I added in the agave and gradually poured in the ice water. Make sure not to actually add the ice in when you do this. Once everything was mixed together fully l I poured the cornmeal into the 9″ pie pan and pressed the dough together creating a crust form. I then put the crust in the oven at 375 degrees for 10 minutes and then removed and set aside.

photo 4

Next I prepared the filling for the quiche. Using a whisk I mixed together the below ingredients a separate bowl and then poured into the baked crust. Next I took the whole quiche and put it into the oven at 375 degrees for about 50 minutes. Check on it at about 45 minutes to make sure it is not over cooking, you can always pull it out of the oven if the top is starting to brown too much.

Filling Ingredients

  • 2 Cups Eggs substitute ( I used 1 1/2 cups egg whites and 2 full eggs)
  • 1/2 1% Milk ( I used Almond Milk)
  • 1 Green Bell Pepper
  • 1 Half an Onion
  • Half a head of Broccoli
  • 1 Tsp of Salt
  • 1 Tsp of Black Pepper
  • 1 Tbs Dried Rosemary

photo 5

Overall the quiche was really yummy! I used Bob’s Red Mill medium grind cornmeal since that is what I had at home and it ended up being too course. So make sure you use s finer cornmeal grain. You can also you different vegetables then what I used. Next time I want to make this with butternut squash and goat cheese. You can also use this crust for a sweeter pie version and fill with apples, blueberries, or any other fruit in season right now. I would love to hear if anyone try’s this and makes a different, but delicious version!


Mom’s Homemade Carrot Cookie Recipe

Growing up I can always remember my mom’s carrot cookies. I can’t specifically remember any occasion that would call for them, but when she surprised my brother and I with a batch it always brought a feeling of joy, comfort, and warmth to me. However no matter how great this surprise was nothing beat actually being able to make the cookies with my mom in the kitchen, for those are probably some of my most cherished childhood memories involving food.

photo 1

 The first thing we would do is grab the vintage Pyrex mixing bowls out of the cabinet, a gift mom and dad received the year they were married back in 1970. To this day vintage Pyrex are the only bowls I can use to mix in, otherwise cooking just does not feel the same to me. My set is from the flea market and every time I grab them it reminds me of my moms.

After setting out our tools we would precisely measure and pour all of the ingredients carefully into the bowl and I would use a giant wood spoon to gradually turn the batter over and over again until it was blended just right. Of course my favorite part of this whole experience was just after everything had been mixed taking the spoon and licking the batter completely off of it. I would then use my finger and wipe my way around the bowl’s rim to make sure and get every last drop I could.

photo 4

 Next my mom and I would carefully place small dollops of the batter onto the greased cookie sheet making sure each cookie was just the right size before placing it into the warm oven.  I remember just waiting in anticipation for the timer to go off. Staring at it as if it would make the time go faster. Once the buzzer would sound my mom would pull the cookies out and take her spatula and place each one out onto the newspaper we had laid out in order for them to cool off.  On a cold Colorado winter day nothing beats warm cookies coming straight from the oven. I hated the 10 minutes I would have to wait till they were cool enough to eat.   However after all of the waiting it was always worth it. The moment the warm cookie touched my lips I could taste the sweetness from the coconut, the hint of vanilla which gave it just a little something extra, the richness from the butter, and just the overall chewy deliciousness that were them.

photo 3

These cookies are not the healthiest per say, however life has to be about these small doses of enjoyment. These are the memories that stick with us as adults and become our comfort on a cold day. Just one taste as an adult brings you right back to the place you enjoyed them as a child. The tricky part is learning how to appreciate them in moderation, something I personally have struggled my whole life with. Last night after a hard day and needing to decide what to make for a for bake sale fundraiser at work I finally landed on the idea that I needed a little comfort in my night and so I decided the carrot cookies were in order. Below is my mom’s original recipe, I hope you all enjoy them as much as I have over the years!

Carrot Cookie Recipe

1 cup. flour
1/4 tsp baking powder
1/4 tsp soda
1/2 cup. white sugar
1/2 cup. brown sugar (use less of both sugars if desired)
1/2 tsp vanilla (I used lemon as I was out of vanilla and it tasted amazing)
1 egg
1/2 cup. grated carrots (I used the pre-grated ones from Trader Joes. Quick and Easy)
3/4 cup. rolled oats
1/4 cup. wheat germ
1/2 cup. coconut
1/2 cup. butter or margarine (I used 1/4 cup of butter and 1/4 cup un-sweetened applesauce to cut calories)

Combine dry ingredients.Cream butter and sugar. Add egg and vanilla.
Stir in rest of ingredients

Bake 350 degrees for 12-15 minutes. Makes 4 dozen